Nockar
Sorceror
How to: BMP to MUL + Map Copy using Dragon & RadMap Copy
How to: BMP to MUL + Map Copy using Dragon & RadMap Copy
Programs Used:
- Dragon with Mod9+ Ryandor.com - Maps for UO Emulation and Half-Life
- RadMap Copy 2.2.0 Ultima Online Builder
How To: Render a BMP map file using Dragon to make your MUL files. Then use RadMap Copy to copy the maps into different map files (if you want or need to).
Dragon:
1) Dragon maps have to be 6144 x 4096 in size. 256 Color (8 Bit) Indexed Color WITH the custom color pallet. You may need a more advanced graphics program to properly save and edit these images. It will not work right when rendering if it does not meet the above requirements. You’ll end up with all sorts of weird stuff.
2) Run Dragon.exe
3) Input > Put in the path for the BMP file of the map.
4) Output > Put in the path to some folder where it can save your map0.mul file.
a. In that same folder, put a copy of staidx0.mul & statics0.mul in there.
5) Config > Check [X] Remove Static Files, Check [X] HighPriority, Check [X] Sphere Statics > click [OK]
6) Click [Start] > the map will then be rendered. DON’T CLICK ANYTHING WHILE ITS GOING
7) Next run Dragonsp.exe
8) Click [All] so all the stuff is highlighted. Then click [Start]. When prompted to erase all current static’s click yes (You want to do this to blank the map)!!
9) Now copy your map0.mul, staidx0.mul, & statics0.mul into your UO dir and load up and test your map!
RadMap Copy:
1) First, you should know it makes it really easy to do this if you were able to render your map (using dragon) up in the top left hand corner! But you can copy part of the map form anywhere.
2) Run radmapcopy.exe > Tools > Create empty map/static’s
3) In the drop down menu, select the map you want to use. I used Malas map in the example.
4) Check [X] Map, [X] Statics > then click [Create] > Go copy your 3 blank files Map3, staidx3, & statics3 files into your UO game directory.
5) Load up game, unfreeze whole map3, wipe whole map, save, freeze.. Just to make sure!
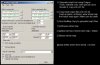
6) Run RadMap Copy to generate map3 files (using your new blank maps + new map0 from Dragon). See the picture for example. Enter the 6 files paths that are needed.
7) The Source & Destination custom map Y numbers are the Y value divided by 8. So 2048/8=256.
8) The X2 & Y2 number are one number below the map size (since I am copying over a map that will replace all of Malas)
9) Check [X] Copy Map, [X] Copy static’s, (X) don’t change any altitude (unless you want to) > click [COPY] DON’T CLICK ANYTHING WHILE ITS GOING
10) Load up game, [unfreeze whole map3
11) Run this commands to get rid of the -256 hue on any black items. Run [global set hue 0 where item map = Malas
12) I would check the map for random items before you freeze the map that didn’t get removed or wired random items. When I did this I ended up with one type of item all over the place. If you need to do global delete on a cetin type of item run [global delete where item itemid = 0x1234
13) [freeze whole map and save.
Using this method I successfully created a new map and copied it into map3 files and it works and looks great!
How to: BMP to MUL + Map Copy using Dragon & RadMap Copy
Programs Used:
- Dragon with Mod9+ Ryandor.com - Maps for UO Emulation and Half-Life
- RadMap Copy 2.2.0 Ultima Online Builder
How To: Render a BMP map file using Dragon to make your MUL files. Then use RadMap Copy to copy the maps into different map files (if you want or need to).
Dragon:
1) Dragon maps have to be 6144 x 4096 in size. 256 Color (8 Bit) Indexed Color WITH the custom color pallet. You may need a more advanced graphics program to properly save and edit these images. It will not work right when rendering if it does not meet the above requirements. You’ll end up with all sorts of weird stuff.
2) Run Dragon.exe
3) Input > Put in the path for the BMP file of the map.
4) Output > Put in the path to some folder where it can save your map0.mul file.
a. In that same folder, put a copy of staidx0.mul & statics0.mul in there.
5) Config > Check [X] Remove Static Files, Check [X] HighPriority, Check [X] Sphere Statics > click [OK]
6) Click [Start] > the map will then be rendered. DON’T CLICK ANYTHING WHILE ITS GOING
7) Next run Dragonsp.exe
8) Click [All] so all the stuff is highlighted. Then click [Start]. When prompted to erase all current static’s click yes (You want to do this to blank the map)!!
9) Now copy your map0.mul, staidx0.mul, & statics0.mul into your UO dir and load up and test your map!
RadMap Copy:
1) First, you should know it makes it really easy to do this if you were able to render your map (using dragon) up in the top left hand corner! But you can copy part of the map form anywhere.
2) Run radmapcopy.exe > Tools > Create empty map/static’s
3) In the drop down menu, select the map you want to use. I used Malas map in the example.
4) Check [X] Map, [X] Statics > then click [Create] > Go copy your 3 blank files Map3, staidx3, & statics3 files into your UO game directory.
5) Load up game, unfreeze whole map3, wipe whole map, save, freeze.. Just to make sure!
6) Run RadMap Copy to generate map3 files (using your new blank maps + new map0 from Dragon). See the picture for example. Enter the 6 files paths that are needed.
7) The Source & Destination custom map Y numbers are the Y value divided by 8. So 2048/8=256.
8) The X2 & Y2 number are one number below the map size (since I am copying over a map that will replace all of Malas)
9) Check [X] Copy Map, [X] Copy static’s, (X) don’t change any altitude (unless you want to) > click [COPY] DON’T CLICK ANYTHING WHILE ITS GOING
10) Load up game, [unfreeze whole map3
11) Run this commands to get rid of the -256 hue on any black items. Run [global set hue 0 where item map = Malas
12) I would check the map for random items before you freeze the map that didn’t get removed or wired random items. When I did this I ended up with one type of item all over the place. If you need to do global delete on a cetin type of item run [global delete where item itemid = 0x1234
13) [freeze whole map and save.
Using this method I successfully created a new map and copied it into map3 files and it works and looks great!
Attachments
-
 How to Dragon & RadMap Copy.jpg78.8 KB · Views: 130