Indepth WorldForge FAQ
"This was a Requested post, i received a PM asking how to work with worldforge, also i intend to do facts covering all map-making software"
Ok another map making FAQ, it this FAQ i will explain indepth worldforge and its functions for all of you eager new map editors out there..
After you have installed Worldforge, run it...
and this is the screen you will get.. aside from the red of course.
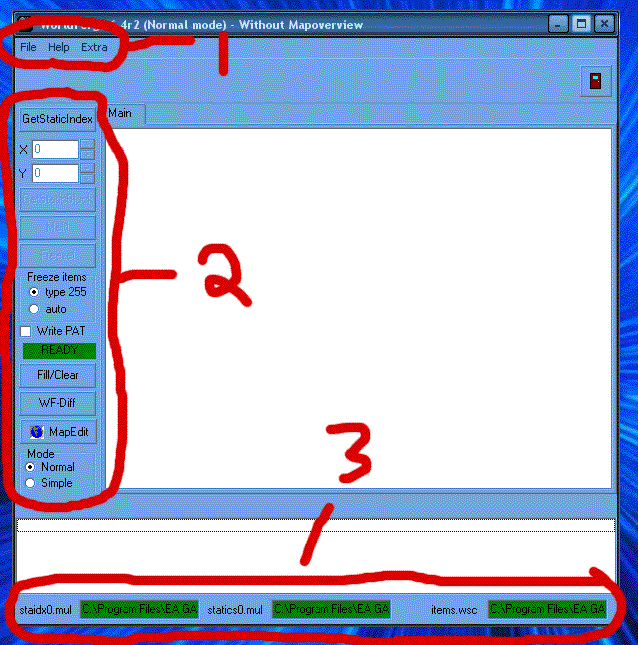
OK lets take a look at it..
Number 1 -
File - Has just Exit in it, allows you to Exit the program.. (woot!)
Help - Allows you to Browse Various help topics
Extra - Allows you to create a Blank map to work on from Scratchs
Allows you to convert a BMP file to a map
(Both options i wouldnt recommend at this point you can get
newer bmp - map converters that are alot more advanced
IE map generator http://worldmaker.ryandor.com/news.php )
Number 2 -
GetstaticIndex - If you have an Items.wsc which can be generated by
UOcopy, UOcoast, UOX, etc you can get the Static Information
From that file to be added permanently to your static files.
The following things will only show up if you have pressed
Get static Index, and have a valid items.wsc.
X, Y, - Are used to select a static Block (from the help file
Each block contains 8x8 tiles. If you divide a /where
coordinate by 8 you'll get the block.)
Getstaticblock - tells you the items in that block
Melt - Will take the static information from your Statics file
and place it into a items.wsc
Freeze - Will take items from a items.wsc and put them in
your static file.
freezes
Item 255 - freezes all items with a 255 (staticvalue)
auto - automatically selects what to freeze.
Fill / Clear -
allows you to fill or clear a specified area
WF-diff
allows you to edit your map diff files. (the things that make up the
additions on trammel)
Mapedit
Allows you to edit Map0.mul
Normal / Simple
Allows you to change between Normal and simple functionality. i
recommend keeping it normal so you can learn how to do these things
Number 3 -
In order to edit anything in this editor you will have to provide it
with the location of your Mul files I.E c:\program files\uo
in these perticular areas you have to tell it the location of your
statics0 and your staidx0 mul files so that you can manipulate them
also your items.wsc if your going to be using this for static items..
OK NEXT
ok on to the mapeditor, click map edit. and you will see the following
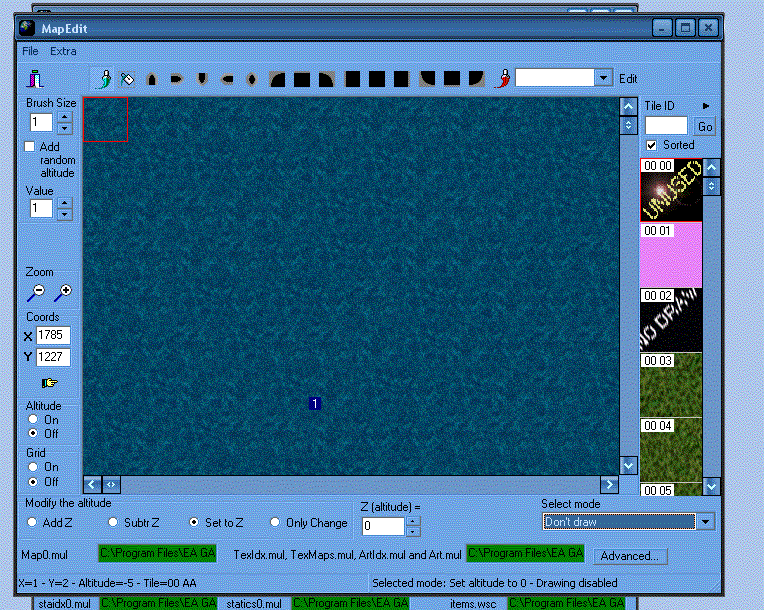
Note: you will not see the ocean tiles in the map at first, because you will not have entered the 2 feilds at the bottom,. so you will have to enter where your map.mul is and your art files are...
Error: Sometimes after you enter your map mul and art mul locations you will receive an error,. it will be like 1/0 32 blah blah error,. just restart the program, normally you will receive this error only if you are trying to edit the map while another program like the ultima online client, or runuo are using the map.mul file, but for some reason, when you enter the feilds the first time, sometimes it does it. dont know why...
Explination
File - allows you to import and export tile data from or to a txt or bmp document..
Extra -
Though you wont need to worrie about this to edit the map,.
ill fill you in to the best of my knowledge.
Change tiles in map - allows you to replace one tile with another
tile by ID (ive never got this to work)
Create new tile - allows you to add a new tile to the list
by its ID number.
Edit tiles - Allows you to edit the tile.
Show texture ID - It will show you the Hex ID of the Tile (0001, 0AE1
etc...)
Color Altitude - Will color your altitude ( i guess its sappose to make
it easyer to see or somthing. but i perfer the more
accurate, show number option)
Show only color - It does exactly as it says, shows you only the
color altitude, and replaces the normal map
tile with it,
Show Number - Shows you the exact Altiude on the tiles with a
number.
Options -
Allows you to veiw texture lists, and select some transition modes.
Selecting Tiles 1
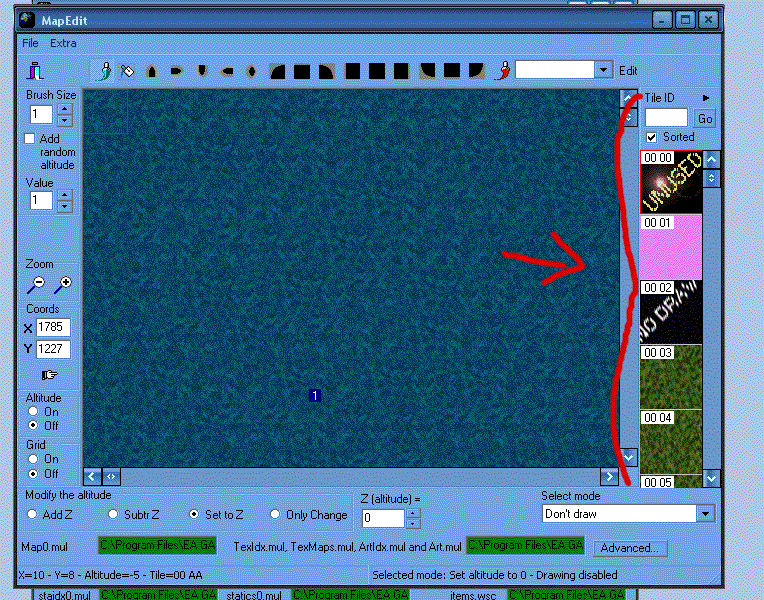
First -
Take a look to the Far right,. that is the Tile list. at the top you will see Tile ID that will allow you to go directly to a tile by its ID number (if you know the tile you want) instead of scrolling through the list.
Second -
Modify the Altitude - look at the bottom left you will see the
following.
Add z - this will allow you to place a tile and add to to the current
altitude,. I.E if the Altitude is 5, and you turn the Add z
option on. and change "Z (altitude) =" number to 5 and place
The tile the resulting Altitude for that tile will be 10.
Subtr Z - this will allow you to place a tile and subtract from the
current Z altitude I.E if the Altitude is 5, and you turn on the
Subtr Z option and change the "Z (altitude) =" number to 5
and place the tile. the resulting Altitude for that tile will be 0
Set to Z - the most usefull of all,. this will allow you to change the
tile on the map to the Z that you place in "Z (altitude) ="
I.E so if the tile on the map is 0,3,10, whatever and you
turn on set to Z option, and change it to 15 and place the
tile the resulting altitude will be 15.. its always sets it
to whatever you have the Z (altitude) number at.
Only Change - It will allow you to change the tile without
changing the altitude, when the option is active..
Random tiles
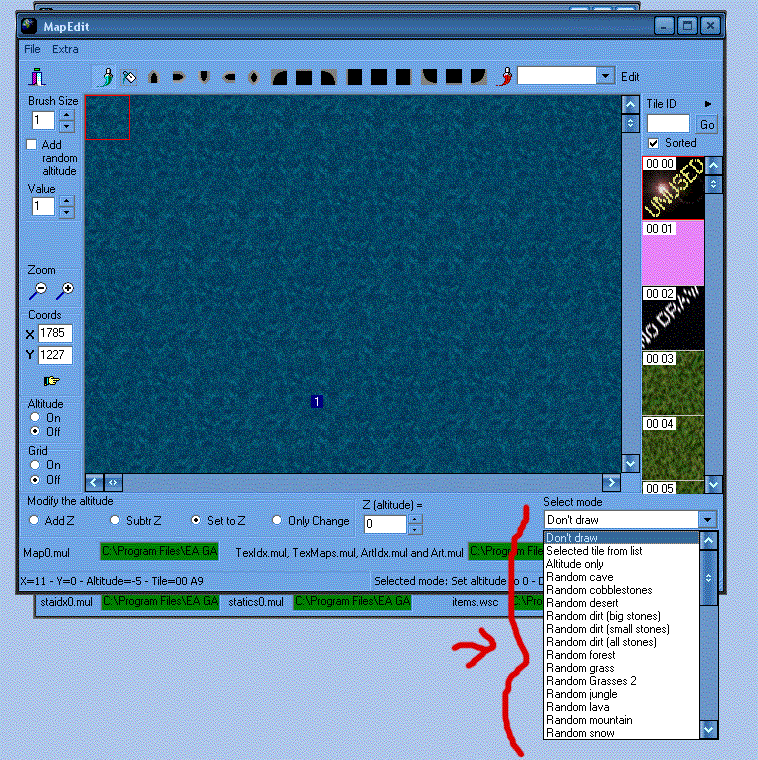
The menu
Dont Draw - it will not allow you to alter the map in anyway when active
Selected tile from list - it will allow you to draw whatever tile you have
selected in the tile list on the right hand side.
Altitude Only - Makes it so your editing only the Altitude without tiles.
Everything else - Youll notice Random mountain, random forest, Random
Grass. it makes it so while your placing,. it places different
Grass tiles,. so it looks more real in the game. insted of a
very cheap carpet from the 70's
Ok now to the options on the left.
Options on the Left
Brush Size - Much like a paint program it allows you to change the size
of the Brush so that you can edit a larger area with the
same tile (works good with the random tiles we just spoke
about)
Add Random Altitude - This is used to add a random altitude while your
editing the map. its good for making bumpy surfaces.
Value - This is the amount of altitude you want it to randomize,. if you say
1, and your altitude is 20, then it will make 19,20,21 increments
if you say 4 and your altitude is 20, it will make 16, 17, 18, 19, 20
21, 22, 23, 24 because your setting the range for random altitude
here.
Zoom - Allows you to zoom in and out of the map a bit.
Coords - you can select cordinates on your map and press that little finger
and it will move the map to the selected location for you.
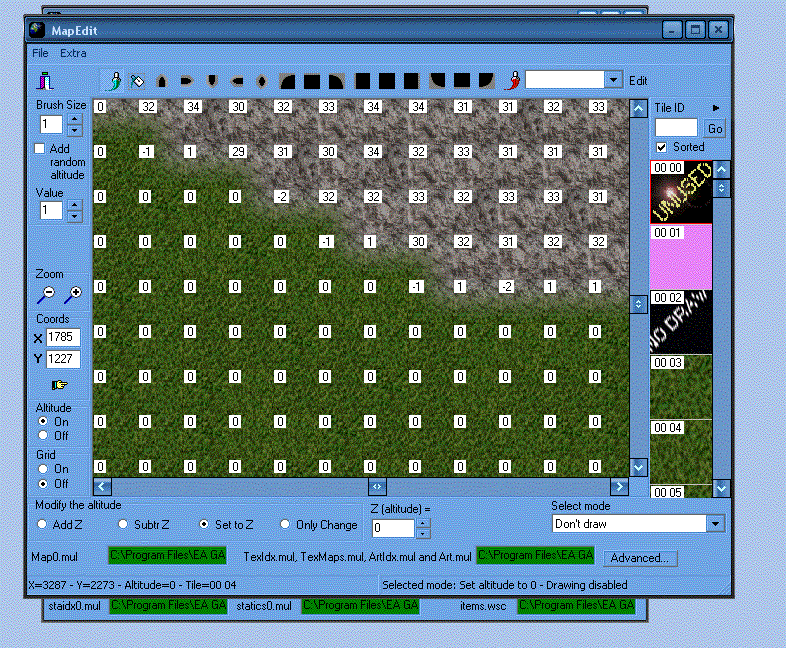
Altitude - this will allow you to see Altitude numbers on the ground tiles
like this..
Grid - This will display a grid. personally its kinda useless because it weirds
up the tiles.. youll see..
Conclusion
Though this program has its advantages locking altitude and its easy
to place tiles. i would not rely on it to make a map solo. but it is a nessesary tool to have. when making a map.
This concludes another FAQ, by Mogbert.
If you have and more questions PM me.
if you find this FAQ usefull please, press my karma button and leave
me a message. i love to get feedback (hehehe and karma)
"This was a Requested post, i received a PM asking how to work with worldforge, also i intend to do facts covering all map-making software"
Ok another map making FAQ, it this FAQ i will explain indepth worldforge and its functions for all of you eager new map editors out there..
After you have installed Worldforge, run it...
and this is the screen you will get.. aside from the red of course.
OK lets take a look at it..
Number 1 -
File - Has just Exit in it, allows you to Exit the program.. (woot!)
Help - Allows you to Browse Various help topics
Extra - Allows you to create a Blank map to work on from Scratchs
Allows you to convert a BMP file to a map
(Both options i wouldnt recommend at this point you can get
newer bmp - map converters that are alot more advanced
IE map generator http://worldmaker.ryandor.com/news.php )
Number 2 -
GetstaticIndex - If you have an Items.wsc which can be generated by
UOcopy, UOcoast, UOX, etc you can get the Static Information
From that file to be added permanently to your static files.
The following things will only show up if you have pressed
Get static Index, and have a valid items.wsc.
X, Y, - Are used to select a static Block (from the help file
Each block contains 8x8 tiles. If you divide a /where
coordinate by 8 you'll get the block.)
Getstaticblock - tells you the items in that block
Melt - Will take the static information from your Statics file
and place it into a items.wsc
Freeze - Will take items from a items.wsc and put them in
your static file.
freezes
Item 255 - freezes all items with a 255 (staticvalue)
auto - automatically selects what to freeze.
Fill / Clear -
allows you to fill or clear a specified area
WF-diff
allows you to edit your map diff files. (the things that make up the
additions on trammel)
Mapedit
Allows you to edit Map0.mul
Normal / Simple
Allows you to change between Normal and simple functionality. i
recommend keeping it normal so you can learn how to do these things
Number 3 -
In order to edit anything in this editor you will have to provide it
with the location of your Mul files I.E c:\program files\uo
in these perticular areas you have to tell it the location of your
statics0 and your staidx0 mul files so that you can manipulate them
also your items.wsc if your going to be using this for static items..
OK NEXT
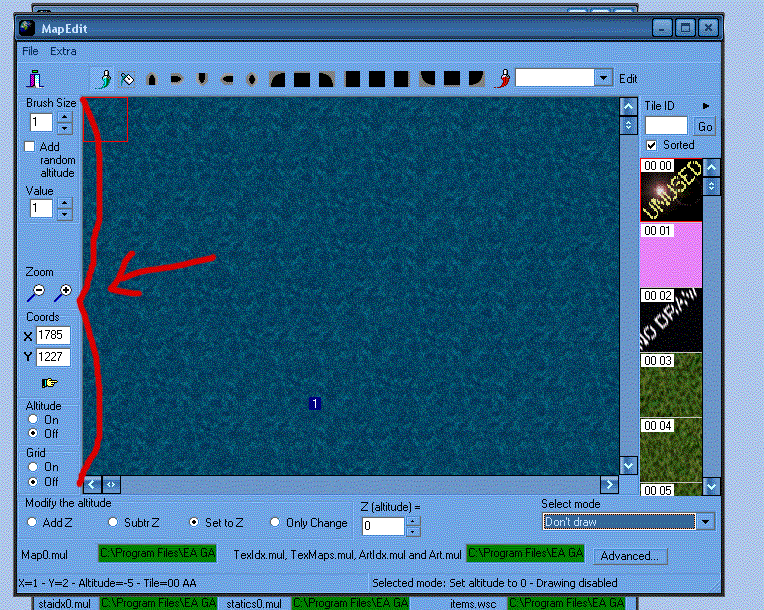
ok on to the mapeditor, click map edit. and you will see the following
Note: you will not see the ocean tiles in the map at first, because you will not have entered the 2 feilds at the bottom,. so you will have to enter where your map.mul is and your art files are...
Error: Sometimes after you enter your map mul and art mul locations you will receive an error,. it will be like 1/0 32 blah blah error,. just restart the program, normally you will receive this error only if you are trying to edit the map while another program like the ultima online client, or runuo are using the map.mul file, but for some reason, when you enter the feilds the first time, sometimes it does it. dont know why...
Explination
File - allows you to import and export tile data from or to a txt or bmp document..
Extra -
Though you wont need to worrie about this to edit the map,.
ill fill you in to the best of my knowledge.
Change tiles in map - allows you to replace one tile with another
tile by ID (ive never got this to work)
Create new tile - allows you to add a new tile to the list
by its ID number.
Edit tiles - Allows you to edit the tile.
Show texture ID - It will show you the Hex ID of the Tile (0001, 0AE1
etc...)
Color Altitude - Will color your altitude ( i guess its sappose to make
it easyer to see or somthing. but i perfer the more
accurate, show number option)
Show only color - It does exactly as it says, shows you only the
color altitude, and replaces the normal map
tile with it,
Show Number - Shows you the exact Altiude on the tiles with a
number.
Options -
Allows you to veiw texture lists, and select some transition modes.
Selecting Tiles 1
First -
Take a look to the Far right,. that is the Tile list. at the top you will see Tile ID that will allow you to go directly to a tile by its ID number (if you know the tile you want) instead of scrolling through the list.
Second -
Modify the Altitude - look at the bottom left you will see the
following.
Add z - this will allow you to place a tile and add to to the current
altitude,. I.E if the Altitude is 5, and you turn the Add z
option on. and change "Z (altitude) =" number to 5 and place
The tile the resulting Altitude for that tile will be 10.
Subtr Z - this will allow you to place a tile and subtract from the
current Z altitude I.E if the Altitude is 5, and you turn on the
Subtr Z option and change the "Z (altitude) =" number to 5
and place the tile. the resulting Altitude for that tile will be 0
Set to Z - the most usefull of all,. this will allow you to change the
tile on the map to the Z that you place in "Z (altitude) ="
I.E so if the tile on the map is 0,3,10, whatever and you
turn on set to Z option, and change it to 15 and place the
tile the resulting altitude will be 15.. its always sets it
to whatever you have the Z (altitude) number at.
Only Change - It will allow you to change the tile without
changing the altitude, when the option is active..
Random tiles
The menu
Dont Draw - it will not allow you to alter the map in anyway when active
Selected tile from list - it will allow you to draw whatever tile you have
selected in the tile list on the right hand side.
Altitude Only - Makes it so your editing only the Altitude without tiles.
Everything else - Youll notice Random mountain, random forest, Random
Grass. it makes it so while your placing,. it places different
Grass tiles,. so it looks more real in the game. insted of a
very cheap carpet from the 70's
Ok now to the options on the left.
Options on the Left
Brush Size - Much like a paint program it allows you to change the size
of the Brush so that you can edit a larger area with the
same tile (works good with the random tiles we just spoke
about)
Add Random Altitude - This is used to add a random altitude while your
editing the map. its good for making bumpy surfaces.
Value - This is the amount of altitude you want it to randomize,. if you say
1, and your altitude is 20, then it will make 19,20,21 increments
if you say 4 and your altitude is 20, it will make 16, 17, 18, 19, 20
21, 22, 23, 24 because your setting the range for random altitude
here.
Zoom - Allows you to zoom in and out of the map a bit.
Coords - you can select cordinates on your map and press that little finger
and it will move the map to the selected location for you.
Altitude - this will allow you to see Altitude numbers on the ground tiles
like this..
Grid - This will display a grid. personally its kinda useless because it weirds
up the tiles.. youll see..
Conclusion
Though this program has its advantages locking altitude and its easy
to place tiles. i would not rely on it to make a map solo. but it is a nessesary tool to have. when making a map.
This concludes another FAQ, by Mogbert.
If you have and more questions PM me.
if you find this FAQ usefull please, press my karma button and leave
me a message. i love to get feedback (hehehe and karma)