Shard Connections & Configuring
Hello, Welcome to the Shard Connections & Configuring FAQ Step By Step Walk Through. This thread was made to assist you setting up your shard for Connections to the public. So people outside your LAN & in your LAN can connect to your shard without any problem.
The whole process is about 4 Steps or so. All you really have to do is follow the steps carefully and you shouldn't have any problems. This was all done by using Windows XP. So Lets Start!
STEP ONE:
First Off: Lets do the simple & basic stuff. Go to your RunUO Folder & Open
RunUO/Scripts/Misc
Find The ServerList.cs File In Your Misc Folder Or You Can Just Do A Search For It. Once you have found it you will need to open it with Notepad or some other advanced C# Writer. (Example: Microsoft C# Express 2005) Once you have opened it look for this part:
This should be found around line 23 in the file.
Your going to be changing the first part to the IP Address that people will use to connect to your shard (Your External IP Address). If You Dont Know What Your IP Address Is You Can Go To IP Chicken and they will provide you with your External IP Address.
The External IP Address doesnt start with 192.xxx.xxx.xxx That is usually your router or your computer IP Address which we will get into later on. Anyhow You Remember that IP Address that IP Chicken Gave You? Copy It And Paste It Into Here
Then We Might As Well Rename Your Shard Too Since you already have the file open. Look For
Close The Serverlist.cs file & Save it.
You Might Want To Write This IP Address That IP Chicken Gives You Because It Will Be Needed A Bit Later
STEP 2:
This step is for all the people who are going to ask about getting your server set up so that other people can connect to it. There are countless posts on this topic. Maybe they are too hard to understand or maybe people are just not seeing the stickies. What I am going to try and do is make this as simple as possible for the networking impaired.
There are basically two ways to have a server connected to the internet. One is behind a router, the other is directly connected to the modem. I would say that the first is the more common way to have your server set up, so that is the one that will be addressed in this step.
Setting up the server behind a router.
Things to know:
2A: The server's internal network IP address.
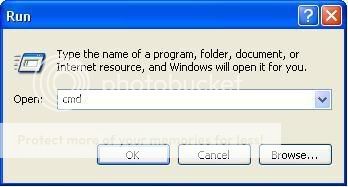
This is the IP address that the server is either given or the server aquires from the router. It is better that you have this set up as a static IP meaning that it does not change after rebooting the machine. The easiest way to give your server a static IP address is to find out what your server's current IP address is and use it for the static IP. To get your current IP address, go to Start-->Run--> and put "cmd" in the box.
This will open up a command window.
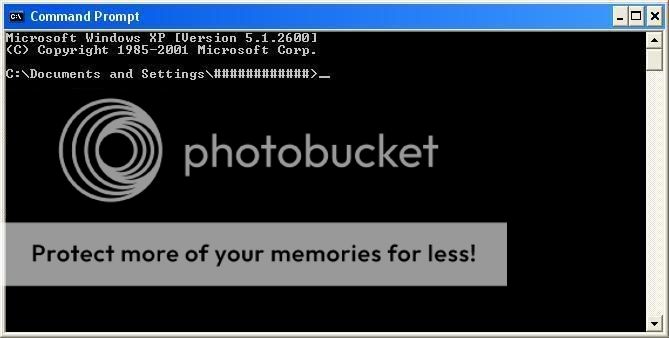
Type the command "ipconfig" and press enter. The window should now display something looking like the following.
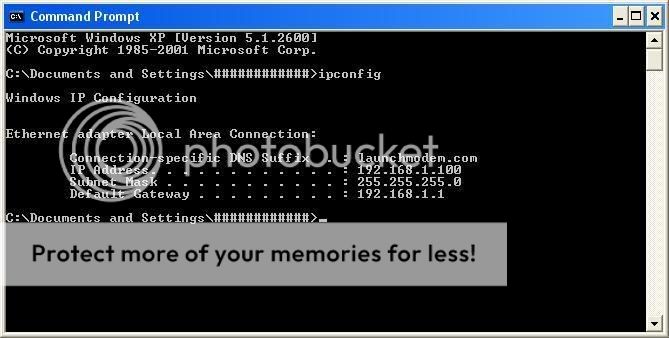
Now your going to need to get a piece of paper and a pen so you can write down all the information!! You will need it all to set the static IP address. When you are done writing that information down, you can close the command window.
2B:Your ISP's DNS numbers.
Using the information that you got from the ipconfig command, open a web browser and type the Default Gateway's IP address into the address box and press enter. This should bring you to the router's login prompt. If this hasn't been changed by the router's owner, one of the following combinations should get you logged into the router. The syntax is as follows: User/Password
admin: admin
password: password
or it can also be
admin:
password: admin
Meaning you leave the admin part blank with totally nothing in it. Some routers have the default user name and password written on the router itself. You can check the router to see if your router has it written on it.
Once you have logged into your router, click on the status button to get your DNS server IPs. There are usually 2 DNS servers: Primary and Secondary. Write them both down.
Making Your Server Using Static IP
Now that you have all the needed information, you are ready to set the server with a static IP address. Open up your network connections through your control panel. Right click on the network connection and select properties. This will open up your LAN properties window.
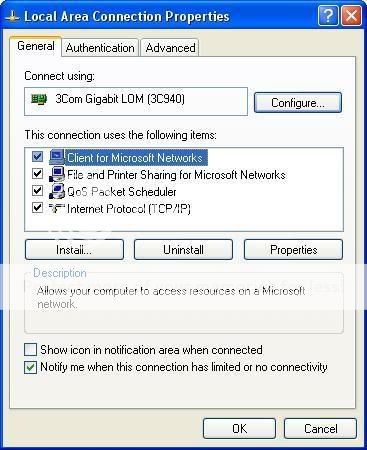
Highlight "Internet Protocol (TCP/IP)" and press the properties buttone below. This will open up the tcp/ip properties window or you can just double click the Internet Protocol (TCP/IP) which will also open up the TCP/IP Properties window.
Once running threw a router your usually not set up for Static IP so the window that you have just opened should look something like this.
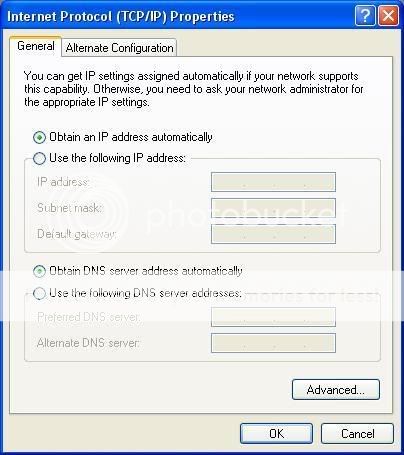
Put a check in "Use the following IP address" This will allow you to fill in all the blanks with the information that you wrote down previously.
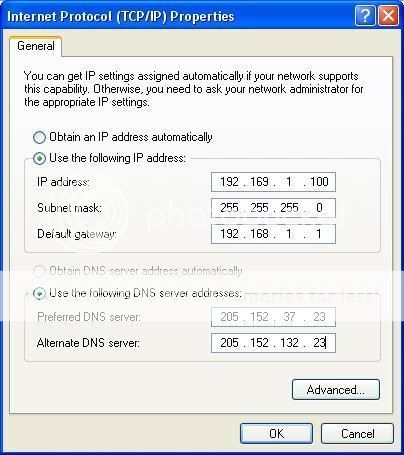
After you have completed putting in all the information, click "OK" in the tcp/ip properties window and it will close. Click "OK" in the Lan Properties window and it will close. Your computer will now have a static IP address that will NOT change after restarting this computer. If in the future you wish to make it DHCP again, just go back to the tcp/ip properties window and put a check in the "Obtain an IP address automatically" spot.
STEP 2C:Setting up your router for port forwarding.
I only have two routers, so I can only go into great detail with those two routers. I have a Netgear and a Linksys router. As these are probably the most common routers in use.
Using A Linksys Router
Step 1. Log into your router.
Step 2. Click the "Applications & Gaming" button.
Step 3. Make the following line in the Port Range section.
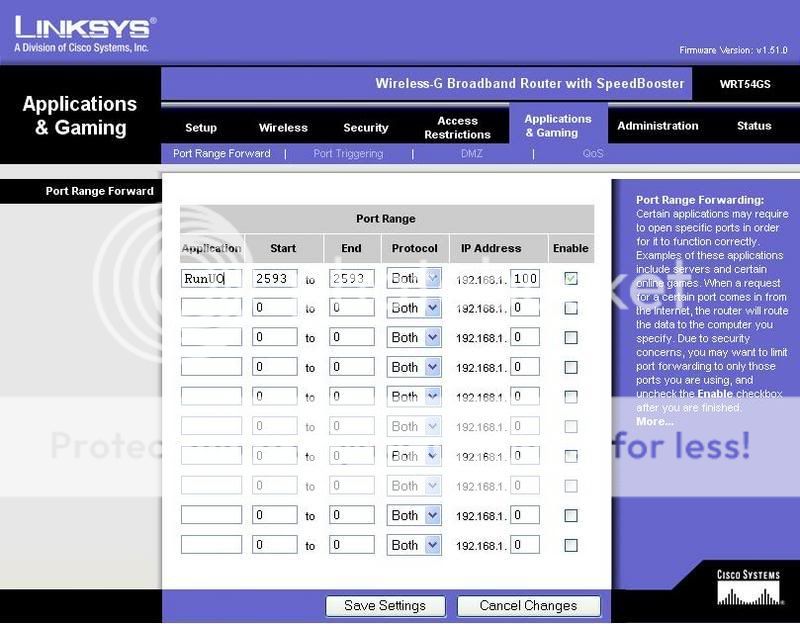
Application = A name you choose.
Start = port start range (2593)
End = port end range (2593)
Protocol = Both
IP Address = Your server's static IP address.
Step 4. After filling in all the blanks, press the "Save Settings" button.
This concludes the section on a Linksys router.
After Finishing These Steps Scroll Down To STEP 4
Using a Netgear router:
Step 1. Log into your router.
Step 2. Click the "Port Forwarding/Port Triggering" button.
Step 3. Click the "Add Custom Service" button.
Step 4. Set it up as follows.
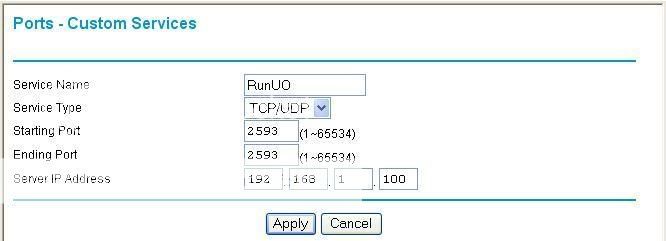
Service Name = A name you choose.
Service Type = TCP/UDP
Starting Port = Port start range (2593)
Ending Port = Port finish range (2593)
Server IP Address = Your server's static IP address.
Step 5. After filling in the blanks, press the "Apply" button.
This concludes the section on a Netgear router.
After Finishing These Steps Scroll Down ToSTEP 4
STEP 3:
This post is for all the people who are going to ask about getting your server set up so that other people can connect to it. Since there are two ways to set up your servers this will talk about using a modem and NOT running behind a router. If you already have a router and did STEP 2 Skip this and go to STEP 4.
Considering that there is many uncountable types of modems that are used to connect to the internet using DSL or Broadband Im going to give a simple and easy way to set it up using another website.
Go ahead and go to Port Forward's Website As it contains many useful information to know and read about. Use the Guide Section & Look around there.
Some Modems you can change into a Router or a Bridge. If you can change your modem into a router that would be great for you which means that you can do STEP 2 Of The Process. I'm Not Sure about other modems but the one im using now is a Thomson Speed Touch Modem which can be turned into a router or bridge. Im not really sure either what your Modems IP Address would be but as for mine (Might be same as yours) Its 192.168.1.254
If you manage to change your modem into a router you can once again use the guides at port forwarding website and choose any application (Like Teamspeak) and it will provide step by step with pictures on how to forward ports.
You DONT Have To Change Your Modem Into A Router You Can If You Want
Step 4: Making Sure Your Firewall Isnt Blocking The Port Your Using.
Firewall can sometimes block the port your using so if you have a firewall in your router or a diffrent firewall other than Windows Firewall installed i cant really help but it would be around the same thing I'd assume.
Usually Windows Firewall Doesnt Block Port 2593 So You Can Just Do This If Your Still Having Problems.
First Off Go To Control Panel & Choose Security Center
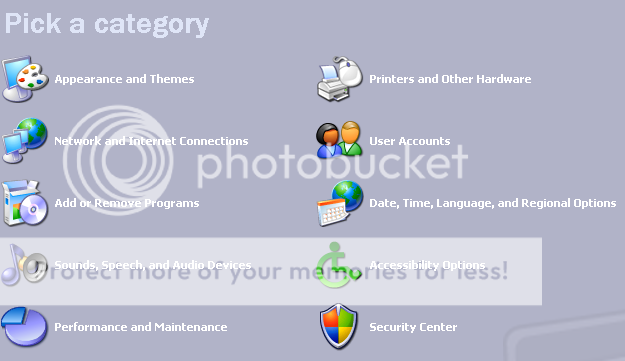
Then Choose Windows Firewall

This Window Should Pop Up
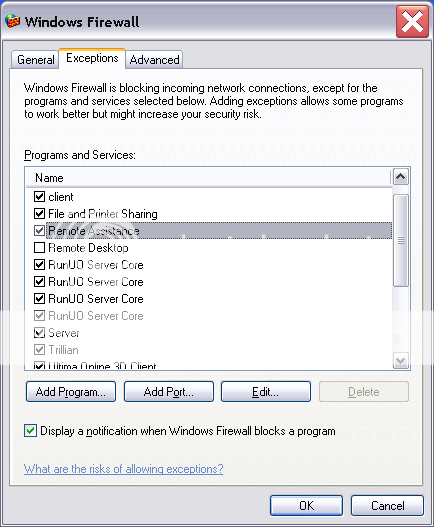
After You Have Chosen Exceptions Click The Add Port Button And Set It Up Something Like This:
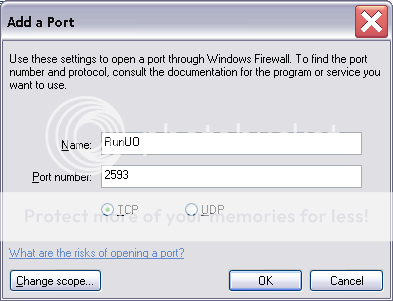
Thats Basically It Just Click Ok Then Ok On The Firewall Window And Your Done!
Like I Said Before You Shouldnt Try Doing This Step Because Windows Firewall Usually Doesnt Block Port 2593 But If Yours Does This Would Be A Way To Let It Make An Exception To Unblock It.
Listing Your Shard Publicly On ConnectUO Or UOGateway
I Don't think you can list your shard on UOGateway anymore but you can on ConnectUO To do so you will need to Login/Register & Then Choose My Shards Then Add New Shard & Read The Rules/Information.
About Static IPs
Some people have had issues with setting up their static IP or saying that thier IP changes everytime they log online. There is usually two soultions to these problems.
1-Go to No-IP & make a free DNS and then download the program they provide and always keep it running that way if your IP changes people can still connect to your shard from your DNS since the program updates the IP that the DNS has to your current IP.
2-Some ISPs don't allow Static IPs, Now im not sure of this its just something iheard about, Im still not sure on how we can fix this problem but i am trying to find out...
If you have a problem setting up your static IP and your internet doesn't work at all that would mean that you need to set it up again carefully and follow the steps up top for setting up a static IP. Make sure that you put in the right IP address thats for your computer & the default gateway (your routers IP) and the correct subnet mask along with the correct DNS numbers which can all be found from the Run command by typing cmd and pressing enter.
Special Thanks Goes To:
I would like to thank jumpnjahosofat for writing & letting me use the images from the Linksys and Netgear routers & the Static IP/Port Forwarding Part Of The Thread. Many Thanks To You Man")
Overall i hope this helps everyone configuring their connections and shard for public access. If you still have any problems i would suggest posting them over at Server Support and maybe we can help there.
Good Luck Everyone & Take Care!
Hello, Welcome to the Shard Connections & Configuring FAQ Step By Step Walk Through. This thread was made to assist you setting up your shard for Connections to the public. So people outside your LAN & in your LAN can connect to your shard without any problem.
The whole process is about 4 Steps or so. All you really have to do is follow the steps carefully and you shouldn't have any problems. This was all done by using Windows XP. So Lets Start!
STEP ONE:
First Off: Lets do the simple & basic stuff. Go to your RunUO Folder & Open
RunUO/Scripts/Misc
Find The ServerList.cs File In Your Misc Folder Or You Can Just Do A Search For It. Once you have found it you will need to open it with Notepad or some other advanced C# Writer. (Example: Microsoft C# Express 2005) Once you have opened it look for this part:
Code:
        private const string Address = "127.0.0.0";

		public const string ServerName = "RunUO TC";
This should be found around line 23 in the file.
Your going to be changing the first part to the IP Address that people will use to connect to your shard (Your External IP Address). If You Dont Know What Your IP Address Is You Can Go To IP Chicken and they will provide you with your External IP Address.
The External IP Address doesnt start with 192.xxx.xxx.xxx That is usually your router or your computer IP Address which we will get into later on. Anyhow You Remember that IP Address that IP Chicken Gave You? Copy It And Paste It Into Here
Code:
        private const string Address = "[color=red]212.56.154.546[/color]";
//See That Number In Red? Thats Where You Type The IP Address That IP Chicken Gave You.
//I Put That Number In Randomly & Dont Forget You MUST Keep The "" One Before & One After The IP Address
Then We Might As Well Rename Your Shard Too Since you already have the file open. Look For
Code:
		public const string ServerName = "[color=red]RunUO TC[/color]";
//In Red Is Where You Place Your Shard Name
Close The Serverlist.cs file & Save it.
You Might Want To Write This IP Address That IP Chicken Gives You Because It Will Be Needed A Bit Later
STEP 2:
This step is for all the people who are going to ask about getting your server set up so that other people can connect to it. There are countless posts on this topic. Maybe they are too hard to understand or maybe people are just not seeing the stickies. What I am going to try and do is make this as simple as possible for the networking impaired.
There are basically two ways to have a server connected to the internet. One is behind a router, the other is directly connected to the modem. I would say that the first is the more common way to have your server set up, so that is the one that will be addressed in this step.
Setting up the server behind a router.
Things to know:
2A: The server's internal network IP address.
This is the IP address that the server is either given or the server aquires from the router. It is better that you have this set up as a static IP meaning that it does not change after rebooting the machine. The easiest way to give your server a static IP address is to find out what your server's current IP address is and use it for the static IP. To get your current IP address, go to Start-->Run--> and put "cmd" in the box.
This will open up a command window.
Type the command "ipconfig" and press enter. The window should now display something looking like the following.
Now your going to need to get a piece of paper and a pen so you can write down all the information!! You will need it all to set the static IP address. When you are done writing that information down, you can close the command window.
2B:Your ISP's DNS numbers.
Using the information that you got from the ipconfig command, open a web browser and type the Default Gateway's IP address into the address box and press enter. This should bring you to the router's login prompt. If this hasn't been changed by the router's owner, one of the following combinations should get you logged into the router. The syntax is as follows: User/Password
admin: admin
password: password
or it can also be
admin:
password: admin
Meaning you leave the admin part blank with totally nothing in it. Some routers have the default user name and password written on the router itself. You can check the router to see if your router has it written on it.
Once you have logged into your router, click on the status button to get your DNS server IPs. There are usually 2 DNS servers: Primary and Secondary. Write them both down.
Making Your Server Using Static IP
Now that you have all the needed information, you are ready to set the server with a static IP address. Open up your network connections through your control panel. Right click on the network connection and select properties. This will open up your LAN properties window.
Highlight "Internet Protocol (TCP/IP)" and press the properties buttone below. This will open up the tcp/ip properties window or you can just double click the Internet Protocol (TCP/IP) which will also open up the TCP/IP Properties window.
Once running threw a router your usually not set up for Static IP so the window that you have just opened should look something like this.
Put a check in "Use the following IP address" This will allow you to fill in all the blanks with the information that you wrote down previously.
After you have completed putting in all the information, click "OK" in the tcp/ip properties window and it will close. Click "OK" in the Lan Properties window and it will close. Your computer will now have a static IP address that will NOT change after restarting this computer. If in the future you wish to make it DHCP again, just go back to the tcp/ip properties window and put a check in the "Obtain an IP address automatically" spot.
STEP 2C:Setting up your router for port forwarding.
I only have two routers, so I can only go into great detail with those two routers. I have a Netgear and a Linksys router. As these are probably the most common routers in use.
Using A Linksys Router
Step 1. Log into your router.
Step 2. Click the "Applications & Gaming" button.
Step 3. Make the following line in the Port Range section.
Application = A name you choose.
Start = port start range (2593)
End = port end range (2593)
Protocol = Both
IP Address = Your server's static IP address.
Step 4. After filling in all the blanks, press the "Save Settings" button.
This concludes the section on a Linksys router.
After Finishing These Steps Scroll Down To STEP 4
Using a Netgear router:
Step 1. Log into your router.
Step 2. Click the "Port Forwarding/Port Triggering" button.
Step 3. Click the "Add Custom Service" button.
Step 4. Set it up as follows.
Service Name = A name you choose.
Service Type = TCP/UDP
Starting Port = Port start range (2593)
Ending Port = Port finish range (2593)
Server IP Address = Your server's static IP address.
Step 5. After filling in the blanks, press the "Apply" button.
This concludes the section on a Netgear router.
After Finishing These Steps Scroll Down ToSTEP 4
STEP 3:
This post is for all the people who are going to ask about getting your server set up so that other people can connect to it. Since there are two ways to set up your servers this will talk about using a modem and NOT running behind a router. If you already have a router and did STEP 2 Skip this and go to STEP 4.
Considering that there is many uncountable types of modems that are used to connect to the internet using DSL or Broadband Im going to give a simple and easy way to set it up using another website.
Go ahead and go to Port Forward's Website As it contains many useful information to know and read about. Use the Guide Section & Look around there.
Some Modems you can change into a Router or a Bridge. If you can change your modem into a router that would be great for you which means that you can do STEP 2 Of The Process. I'm Not Sure about other modems but the one im using now is a Thomson Speed Touch Modem which can be turned into a router or bridge. Im not really sure either what your Modems IP Address would be but as for mine (Might be same as yours) Its 192.168.1.254
If you manage to change your modem into a router you can once again use the guides at port forwarding website and choose any application (Like Teamspeak) and it will provide step by step with pictures on how to forward ports.
You DONT Have To Change Your Modem Into A Router You Can If You Want
Step 4: Making Sure Your Firewall Isnt Blocking The Port Your Using.
Firewall can sometimes block the port your using so if you have a firewall in your router or a diffrent firewall other than Windows Firewall installed i cant really help but it would be around the same thing I'd assume.
Usually Windows Firewall Doesnt Block Port 2593 So You Can Just Do This If Your Still Having Problems.
First Off Go To Control Panel & Choose Security Center
Then Choose Windows Firewall
This Window Should Pop Up
After You Have Chosen Exceptions Click The Add Port Button And Set It Up Something Like This:
Thats Basically It Just Click Ok Then Ok On The Firewall Window And Your Done!
Like I Said Before You Shouldnt Try Doing This Step Because Windows Firewall Usually Doesnt Block Port 2593 But If Yours Does This Would Be A Way To Let It Make An Exception To Unblock It.
Listing Your Shard Publicly On ConnectUO Or UOGateway
I Don't think you can list your shard on UOGateway anymore but you can on ConnectUO To do so you will need to Login/Register & Then Choose My Shards Then Add New Shard & Read The Rules/Information.
About Static IPs
Some people have had issues with setting up their static IP or saying that thier IP changes everytime they log online. There is usually two soultions to these problems.
1-Go to No-IP & make a free DNS and then download the program they provide and always keep it running that way if your IP changes people can still connect to your shard from your DNS since the program updates the IP that the DNS has to your current IP.
2-Some ISPs don't allow Static IPs, Now im not sure of this its just something iheard about, Im still not sure on how we can fix this problem but i am trying to find out...
If you have a problem setting up your static IP and your internet doesn't work at all that would mean that you need to set it up again carefully and follow the steps up top for setting up a static IP. Make sure that you put in the right IP address thats for your computer & the default gateway (your routers IP) and the correct subnet mask along with the correct DNS numbers which can all be found from the Run command by typing cmd and pressing enter.
Special Thanks Goes To:
I would like to thank jumpnjahosofat for writing & letting me use the images from the Linksys and Netgear routers & the Static IP/Port Forwarding Part Of The Thread. Many Thanks To You Man
Overall i hope this helps everyone configuring their connections and shard for public access. If you still have any problems i would suggest posting them over at Server Support and maybe we can help there.
Good Luck Everyone & Take Care!