Vorspire
Knight
The Perfect Solution [Visual Studio 2008]

I often see new developers with some simple problems, whether it be silly syntax errors or simple typos to the ever popular 'Does not exist in the current context' error or 500 errors generated by a single missing code-block bracer.
Well I've decided to try and cut our silliness down by at least 50% by presenting you with this extremely easy-to-follow step-by-step tutorial on setting up your RunUO scripts as a project in Visual Studio 2008 C# Express.
__________________________________________________
#1
First off, you'll need Visual Studio (There are a few versions but 2008 Express is 100% free); Visual C# 2008 Express Edition
It may take a while to install, but it's sure-as-hell worth it...
__________________________________________________
#2
It's time to set-up your development environment, follow this simple list of sub-steps;
#3
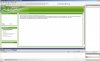
You should have a Start Page already open in the file view, infact, your VS should look like this by now; (SCREENSHOT)
If you don't have the Start Page open by default, you can still complete the following steps by using the File context menu.
__________________________________________________
#4
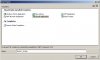
Creating a new project is simple, simply click Create: Project... in the Start Page - Recent Projects pane or click File -> New Project.
You will be confronted with a dialog menu that will ask you to select the type of project and a name for it; (SCREENSHOT)
Make sure you select Console Application and enter the name RunUO_Scripts (As shown in the image)
__________________________________________________
#5
You have successfully created a new project, but hold up, it isn't quite ready for your RunUO scripts!
You should be presented with a screen similar to this; (SCREENSHOT)
The first thing you need to do is DELETE the Program.cs from the Solution Explorer pane.
Click OK if prompted with "Program.cs will be deleted permanently".
__________________________________________________
#6
Now you need to set up the project Properties, these properties will determine things such as what the target .NET Framework should be, the default namespace of the project, etc...
To access the project properties, right-click on
 RunUO_Scripts in the Solution Explorer and select Properties.
Do not be mis-guided by the Properties menu-item in the Solution Explorer pane, you won't need to mess with that.
__________________________________________________
#7
Before you continue, you must Save the current project, so that the changed properties can be saved correctly and so you can avoid any more annoying prompts.
Click File -> Save All.
You will be presented with another dialog asking you to select a working directory for your project and provide a name for it; (SCREENSHOT)
The default location will be (Windows XP) C:/Documents and Settings/<User>/My Documents/Visual Studio 2008/Projects/ OR (Windows Vista / 7) C:/Users/<User>/My Documents/Visual Studio 2008/Projects/ but for the purpose of this tutorial, I'm going to save it in C:/
Note that the "Create directory for solution" checkbox is checked, which means that the final path will be C:/RunUO_Scripts/.
Click Save.
__________________________________________________
#8
Now it's time to edit those properties, the list below describes the option name and the setting you should have;
Application Tab
Repeat Step #6 to re-open the Properties pane.
Build Tab
Save and close the Properties pane.
__________________________________________________
#9
We are almost there, I promise!
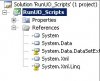
All that is left to do now is edit the project references, this is extremely easy and impossible to mess up, so don't worry, really.
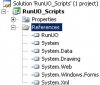
In the Solution Explorer pane, expand the References menu-item, it should look like this; (SCREENSHOT)
You will notice that 2 of the references are flagged as missing, this is because they are .NET 3.5 references and we don't need them in this .NET 2.0 project, so go ahead and remove them;
Right-click on the missing references and click Remove.
You now need to Add a couple references in order for your scripts to debug properly...
To add a standard reference, you must right-click on the References menu-item and click Add Reference.
You will be presented with a dialog with a few tabs along the top and a list of references to choose from, the references you need to add are found in the .NET tab, which should also be the default tab selected.
You need to add these references;
System.Windows.Forms, System.Drawing and System.Web
But wait, there's more...
We also need to create a custom reference to our RunUO.exe executable, which is extremely simple too;
You need to add another reference, but this time, it won't be in the .NET tab of the Add Reference dialog, you will have to click the Browse tab...
You need to browse to and select your RunUO.exe from wherver you store your RunUO shard...
When the custom reference has been added for the RunUO.exe, it will be automatically copied to your project's working directory.
Your references should look like this now; (SCREENSHOT)
Save the project, File -> Save All
__________________________________________________
#10
OK, everything is set to go!
But what about my scripts? I hear you ask, well this is the fun part;
Use Windows Explorer to navigate to your RunUO directory (The directory where you keep your Scripts and all things that are RunUO and your shard).
Now you're going to have to utilize those nifty drag-and-drop skills Windows has tought you over the month or years...
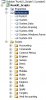
Select your Scripts directory and Drag it onto
RunUO_Scripts in the Solution Explorer pane inside Visual Studio.
Visual Studio should now begin the process of transferring all your RunUO scripts to your project's working directory, the end result should look like this; (SCREENSHOT)
Save the project, File -> Save All
__________________________________________________
DONE!
Everything is good to go, you are ready to start developing your scripts like a pro.
To test your project set-up, simply hit F5 to start debugging, or click the little green button that looks like a "play" icon on the top menu.
If you have NO ERRORS in your scripts and everything compiles successfully, you will receive this error in the Error List pane:
This is expected.
__________________________________________________
Congratulations
Now just a couple notes for the future;
Bonus References
I hope this tutorial was useful and not too hard for you to follow, if you have any comments, questions or sugestions, please don't hesitate to reply here!
-Vorspire
The Perfect Solution
A Step-By-Step Guide to Visual Studio 2008 (All Version) Project Setup
__________________________________________________
Are you developing your scripts with Wordpad, or worse, Notepad?
STOP!
__________________________________________________
I often see new developers with some simple problems, whether it be silly syntax errors or simple typos to the ever popular 'Does not exist in the current context' error or 500 errors generated by a single missing code-block bracer.
Well I've decided to try and cut our silliness down by at least 50% by presenting you with this extremely easy-to-follow step-by-step tutorial on setting up your RunUO scripts as a project in Visual Studio 2008 C# Express.
__________________________________________________
#1
First off, you'll need Visual Studio (There are a few versions but 2008 Express is 100% free); Visual C# 2008 Express Edition
It may take a while to install, but it's sure-as-hell worth it...
__________________________________________________
#2
It's time to set-up your development environment, follow this simple list of sub-steps;
- Start VS
- Click View -> Solution Explorer (A pane should open on the right-side)
- Click View -> Error List (A pane should open on the bottom)
- Done, you are ready to set-up the RunUO Project!
#3
You should have a Start Page already open in the file view, infact, your VS should look like this by now; (SCREENSHOT)
If you don't have the Start Page open by default, you can still complete the following steps by using the File context menu.
__________________________________________________
#4
Creating a new project is simple, simply click Create: Project... in the Start Page - Recent Projects pane or click File -> New Project.
You will be confronted with a dialog menu that will ask you to select the type of project and a name for it; (SCREENSHOT)
Make sure you select Console Application and enter the name RunUO_Scripts (As shown in the image)
__________________________________________________
#5
You have successfully created a new project, but hold up, it isn't quite ready for your RunUO scripts!
You should be presented with a screen similar to this; (SCREENSHOT)
The first thing you need to do is DELETE the Program.cs from the Solution Explorer pane.
Click OK if prompted with "Program.cs will be deleted permanently".
__________________________________________________
#6
Now you need to set up the project Properties, these properties will determine things such as what the target .NET Framework should be, the default namespace of the project, etc...
To access the project properties, right-click on
Do not be mis-guided by the Properties menu-item in the Solution Explorer pane, you won't need to mess with that.
__________________________________________________
#7
Before you continue, you must Save the current project, so that the changed properties can be saved correctly and so you can avoid any more annoying prompts.
Click File -> Save All.
You will be presented with another dialog asking you to select a working directory for your project and provide a name for it; (SCREENSHOT)
The default location will be (Windows XP) C:/Documents and Settings/<User>/My Documents/Visual Studio 2008/Projects/ OR (Windows Vista / 7) C:/Users/<User>/My Documents/Visual Studio 2008/Projects/ but for the purpose of this tutorial, I'm going to save it in C:/
Note that the "Create directory for solution" checkbox is checked, which means that the final path will be C:/RunUO_Scripts/.
Click Save.
__________________________________________________
#8
Now it's time to edit those properties, the list below describes the option name and the setting you should have;
Application Tab
- Assembly Name: RunUO_Scripts
- Default Namespace: Server
- Target Framework: .NET Framework 2.0 ***
Repeat Step #6 to re-open the Properties pane.
Build Tab
- Allow Unsafe Code: CHECKED - [X]
- Optimize Code: CHECKED - [X]
Save and close the Properties pane.
__________________________________________________
#9
We are almost there, I promise!
All that is left to do now is edit the project references, this is extremely easy and impossible to mess up, so don't worry, really.
In the Solution Explorer pane, expand the References menu-item, it should look like this; (SCREENSHOT)
You will notice that 2 of the references are flagged as missing, this is because they are .NET 3.5 references and we don't need them in this .NET 2.0 project, so go ahead and remove them;
Right-click on the missing references and click Remove.
You now need to Add a couple references in order for your scripts to debug properly...
To add a standard reference, you must right-click on the References menu-item and click Add Reference.
You will be presented with a dialog with a few tabs along the top and a list of references to choose from, the references you need to add are found in the .NET tab, which should also be the default tab selected.
You need to add these references;
System.Windows.Forms, System.Drawing and System.Web
But wait, there's more...
We also need to create a custom reference to our RunUO.exe executable, which is extremely simple too;
You need to add another reference, but this time, it won't be in the .NET tab of the Add Reference dialog, you will have to click the Browse tab...
You need to browse to and select your RunUO.exe from wherver you store your RunUO shard...
When the custom reference has been added for the RunUO.exe, it will be automatically copied to your project's working directory.
Your references should look like this now; (SCREENSHOT)
Save the project, File -> Save All
__________________________________________________
#10
OK, everything is set to go!
But what about my scripts? I hear you ask, well this is the fun part;
Use Windows Explorer to navigate to your RunUO directory (The directory where you keep your Scripts and all things that are RunUO and your shard).
Now you're going to have to utilize those nifty drag-and-drop skills Windows has tought you over the month or years...
Select your Scripts directory and Drag it onto
Visual Studio should now begin the process of transferring all your RunUO scripts to your project's working directory, the end result should look like this; (SCREENSHOT)
Save the project, File -> Save All
__________________________________________________
DONE!
Everything is good to go, you are ready to start developing your scripts like a pro.
To test your project set-up, simply hit F5 to start debugging, or click the little green button that looks like a "play" icon on the top menu.
If you have NO ERRORS in your scripts and everything compiles successfully, you will receive this error in the Error List pane:
Code:
Program 'C:\RunUO_Scripts\RunUO_Scripts\obj\Debug\RunUO_Scripts.exe' does not contain a static 'Main' method suitable for an entry point.This is expected.
__________________________________________________
Congratulations
Now just a couple notes for the future;
- Whenever you change/edit and save a script in Visual Studio using your project, you will have to copy the edited script file from your project's working directory, over to your RunUO scripts directory for the changes to take effect in RunUO.
- DO NOT add files to your project working directory from outside Visual Studio, because VS will not add the files to your project automatically, you should always use the drag-and-drop method when adding new files to your project.
- The same goes for deleting files... Delete them from inside VS, or VS will not be too happy when it tries to load non-existant files.
Bonus References
I hope this tutorial was useful and not too hard for you to follow, if you have any comments, questions or sugestions, please don't hesitate to reply here!
-Vorspire
Attachments
-
 VS01.jpg160.2 KB · Views: 930
 -
 VS02.jpg34.2 KB · Views: 691
 -
 VS03.jpg120.6 KB · Views: 712
 -
 VSICON.jpg1.2 KB · Views: 2,099
 -
 VS04.jpg19.5 KB · Views: 476
 -
 VS05.jpg12.8 KB · Views: 650
 -
 VS06.jpg14.3 KB · Views: 679
 -
 VS07.jpg29.2 KB · Views: 661
")

 )
)


