Nockar
Sorceror
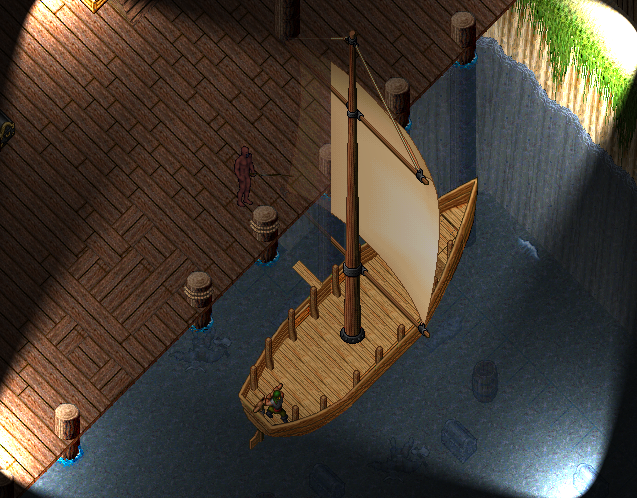
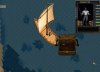
Hi there! Here is how to make transparent water!! The files in this post & the tutorial will describe the process needed to add transparent water. You can use this process to create under water visuals, docks, streams, dungeons, anything really that you want.
You will need a basic understanding of how to use Mulpatcher & CentrEd (or other map editing program) in order to accomplish this process.
Needed Tools:
Mulpatcher – for adding the new art files & editing the tiledata.mul
CentrED & CentrED Server – Used for editing the map terrain height. You can use other programs to do this as well.
Files:
Transparent Water.zip – These are the art files you will need
Optional Water Decorations.zip – Some nice optionally decorations images. I think they came from uo-pixel.de
Optional Water LandTiles.zip – These are optionally ‘Land Tile’ water replacements. I was trying to make them a little closes in look to the transparent water tiles.
CentrED and CcedServer.zip – Some helpfully files for getting CentrED going.
How To:
- Add the new Art -
1) Backup your files.
2) Open Mulpatcher > Go to Settings Tab > Load Tiledata.mul, Artidx.mul, & Art.mul
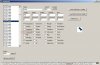
3) Go to Tiledata(S) Tab > Search for 0x1796 > form 0x1796 to 0x17B2 check the box that says [X] Translucent for all of them.
4) Go to Art(S) Tab > Search for 0x1796 > > Replace all of the water images with the new water image found in ‘Transparent Water.zip’.
5) Optionally: Go to 0x346E to 0x3530 (skipping rocks & other none water tiles) and set them to [X] Translucent if you would like to be able to see through them as well.
6) Optionally: Add in the new decoration art and or the new LandTile Art.
7) Go to Settings Tab > Save Tiledata.mul, Artidx.mul, & Art.mul
- Editing Your Map -
8) BACK UP YOUR FILES BEFORE USING CentrED. I think it does saves on the fly and if you mess up it could auto edit the files on you all by its self.
9) CentrED Basic Setup Instructions…. (it can be a pain to get it going)
a. Install / extract the two exe files (CentrED Setup.exe & CentrED_win32_0-6-1.exe)
b. Edit the XML file for CenteED
c. Run sedserver.exe (make sure UO & RunUO is all closed nothing else can be reading the mul files while CentrED is going)
d. Start CenteED & setup your profile and then connect to the server
e. Under use/pass enter it (I don’t remember were this got setup)
f. Start editing
g. Save using ‘Flush’
10) Next, open up CentrED server & Client (or other map editing tool).
11) Once you have CentrED going go to the correct map location.
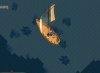
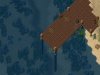
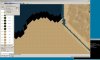
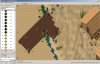
12) Pick the ‘Draw Tiles’ tool > set it to [X] Force altitude: -30 (or what ever depth you want)
13) Pick your preferred ground tile type form the list. In the example I am using sand.
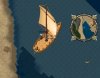
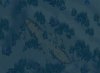
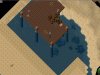
14) Now go to the map and stat click on the water tile until you have your desired area cleared out.
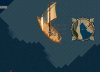
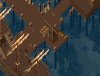
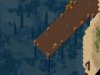
15) Youll notice along the bank there is probably this brownish or black space. This is the space that there are no tiles yet but its still being ‘stretched’. What you want to do is keep clicking closer to the bank with the sand (or other ground tile) until you get a nice clean transition as shown in the image. Note: In the images I have already cleaned up the brow stuff. I don’t want to keep editing this map so there wont be a screen shot of it. But you’ll see what I am talking about. Just carefully keep clicking on the brow until it all goes away.
16) Once you are satisfied with your edits > Go to Administration > Flush (Save) > I wait a little bit and then a Flush a 2nd time to make sure it really saved. Then do a Shutdown.
- Decorating -
17) Start up RunUO & your client. Make sure they are pointing to your edited files.
18) Next, you going to decorate the new area. I found its easier to decorate first then use PandorasBox to add in your water tile on top of it. You can probably set the depth to -5 (ocean water height), set it to random(6) and use the tile button to quickly add in your new water tiles. You’ll then have to go in and add some water tiles by hand.
19) Once it’s all done use the [freeze on your map!
20) That’s it!
You will need a basic understanding of how to use Mulpatcher & CentrEd (or other map editing program) in order to accomplish this process.
Needed Tools:
Mulpatcher – for adding the new art files & editing the tiledata.mul
CentrED & CentrED Server – Used for editing the map terrain height. You can use other programs to do this as well.
Files:
Transparent Water.zip – These are the art files you will need
Optional Water Decorations.zip – Some nice optionally decorations images. I think they came from uo-pixel.de
Optional Water LandTiles.zip – These are optionally ‘Land Tile’ water replacements. I was trying to make them a little closes in look to the transparent water tiles.
CentrED and CcedServer.zip – Some helpfully files for getting CentrED going.
How To:
- Add the new Art -
1) Backup your files.
2) Open Mulpatcher > Go to Settings Tab > Load Tiledata.mul, Artidx.mul, & Art.mul
3) Go to Tiledata(S) Tab > Search for 0x1796 > form 0x1796 to 0x17B2 check the box that says [X] Translucent for all of them.
4) Go to Art(S) Tab > Search for 0x1796 > > Replace all of the water images with the new water image found in ‘Transparent Water.zip’.
5) Optionally: Go to 0x346E to 0x3530 (skipping rocks & other none water tiles) and set them to [X] Translucent if you would like to be able to see through them as well.
6) Optionally: Add in the new decoration art and or the new LandTile Art.
7) Go to Settings Tab > Save Tiledata.mul, Artidx.mul, & Art.mul
- Editing Your Map -
8) BACK UP YOUR FILES BEFORE USING CentrED. I think it does saves on the fly and if you mess up it could auto edit the files on you all by its self.
9) CentrED Basic Setup Instructions…. (it can be a pain to get it going)
a. Install / extract the two exe files (CentrED Setup.exe & CentrED_win32_0-6-1.exe)
b. Edit the XML file for CenteED
c. Run sedserver.exe (make sure UO & RunUO is all closed nothing else can be reading the mul files while CentrED is going)
d. Start CenteED & setup your profile and then connect to the server
e. Under use/pass enter it (I don’t remember were this got setup)
f. Start editing
g. Save using ‘Flush’
10) Next, open up CentrED server & Client (or other map editing tool).
11) Once you have CentrED going go to the correct map location.
12) Pick the ‘Draw Tiles’ tool > set it to [X] Force altitude: -30 (or what ever depth you want)
13) Pick your preferred ground tile type form the list. In the example I am using sand.
14) Now go to the map and stat click on the water tile until you have your desired area cleared out.
15) Youll notice along the bank there is probably this brownish or black space. This is the space that there are no tiles yet but its still being ‘stretched’. What you want to do is keep clicking closer to the bank with the sand (or other ground tile) until you get a nice clean transition as shown in the image. Note: In the images I have already cleaned up the brow stuff. I don’t want to keep editing this map so there wont be a screen shot of it. But you’ll see what I am talking about. Just carefully keep clicking on the brow until it all goes away.
16) Once you are satisfied with your edits > Go to Administration > Flush (Save) > I wait a little bit and then a Flush a 2nd time to make sure it really saved. Then do a Shutdown.
- Decorating -
17) Start up RunUO & your client. Make sure they are pointing to your edited files.
18) Next, you going to decorate the new area. I found its easier to decorate first then use PandorasBox to add in your water tile on top of it. You can probably set the depth to -5 (ocean water height), set it to random(6) and use the tile button to quickly add in your new water tiles. You’ll then have to go in and add some water tiles by hand.
19) Once it’s all done use the [freeze on your map!
20) That’s it!
Attachments
-
 Example_Of_Water.jpg114.8 KB · Views: 567
 -
 Mulpatcher.jpg67.5 KB · Views: 397
 -
 CentrED_01.jpg76.9 KB · Views: 486
 -
 CentrED_02.jpg109 KB · Views: 463
 -
Transparent Water.zip23 KB · Views: 117
-
Optional Water LandTiles.zip2.5 KB · Views: 94
-
Optional Water Decorations.zip102.9 KB · Views: 96
-
CentrED and CcedServer.zip2.3 MB · Views: 62
")
 ....
....